What is Refactoring?
First, a quick note on refactoring code for those new to the idea. Lot’s of different configurations and styles of code will get the job done. Refactoring is about organizing and cleaning up your code for a few reasons.
First is readability. If someone else is going to work on something you built, you want to give them an easy way to understand what is going on. Not to mention, if you want to pick up an old codebase after a few months, you want to leave yourself a nice rode map to what things are doing and where. Refactoring your code will help keep concerns separate and will tell you exactly where to look to find each piece of functionality.
Second is optimization. This is a bit trickier and has less to do with organization and naming conventions and more to do with an understanding of which operations and methods are more costly to perform than others. There are a lot of great resources on this, but we’re going to stick with the readability side of refactoring for this post.
What is Component Design?
When deep into a code project, I can get tunnel vision on the tasks I’m trying to solve. I’m deep into a file, I know exactly where everything is and how it all interacts. But when I come back to that document a day later, it just looks like a mess. If a bug creeps in, I’m helpless. The component container design pattern is a really helpful way to organize React code. There are a few simple rule of thumb which we will demo in the rest of the post. Simply put, Containers are responsible for fetching data, keeping state and behavior, and passing the relevant bits of info down to its children. Components are ideally simple functions that receive props from their parent container and render HTML as JSX.
Let’s Build a Simple App in One Messy Place
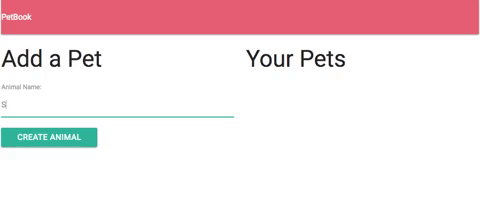
To demo this idea, we’re going to build a very simple PetBook app with three pieces. First there is a simple nav bar with our Logo. Second there is a form to add animal names. Third, there is a list of the animals we’ve entered. The App will work like this:
We’re using three files to build PetBook: index.html, index.js, and app.js. We’re also using Materialize CSS for some styling. Let’s take a look at our index.html page:
1 2 3 4 5 6 7 8 9 10 11 12 13 14 | |
It’s super short and sweet. We’re bundling our files using webpacks to make development iterations quick and painless. Otherwise, our entire app is being rendered in the container div. Next, let’s take a look at index.js:
1 2 3 4 | |
Another super short and sweet file. All this is doing is requiring react and react-dom and rendering the app to the index.html page by attaching its contents to the div with the id of ‘container.’ Finally, let’s take a look at where all the magic is happening. Our colossal App.js file:
1 2 3 4 5 6 7 8 9 10 11 12 13 14 15 16 17 18 19 20 21 22 23 24 25 26 27 28 29 30 31 32 33 34 35 36 37 38 39 40 41 42 43 44 45 46 47 48 49 50 51 52 53 54 55 56 57 58 59 60 61 62 63 64 65 66 | |
This file is huge. Especially for such a simple app! This will get very tricky to debug or to add to in a hurry, not to mention, working on this file will wear out your mouse’s scroll wheel really quickly. Looking at the working app, it’s pretty easy to see that there are three things going on. First, there’s the nav bar. Second is the form for entering animal names. Last is the Pet list. I wonder if there’s a way to organize this. There totally is!
Separating Concerns Out Nicely
Using our guidelines from before, we can say that the form is the only part of our app responsible for creating and handling data, so that will be a stateful component. Everything else can be a functional, or presentational container. We’re going to organize all this into a folder called ‘src’. Don’t forget to update any dependencies in your application to account for the path changes. The App.js file now lives in our containers folder and is only responsible for rendering the nav bar and the Pet Form container. It now looks like this:
1 2 3 4 5 6 7 8 9 10 11 12 | |
Short and sweet! Next is our nav bar component. The job of our nav bar is only to render the nav bar. Pretty straight forward, right! In the future. If we want to add more pages to this application, we can include this nav bar container and keep any changes consistent across our entire app just by updating this file. Here it is:
1 2 3 4 5 6 7 8 9 10 11 12 13 | |
This is looking great so far, but we haven’t gotten to the meat and potatoes of our petbook app yet. Here is our Pet Form container it is a stateful classical container that inherits from the react compnent library. It’s responsible for controlling the user input, maintaining a list of the user’s pets in an animals array, and it is able to add a new animal from the form to the animals array and rerender the Pet List component to display the changes. Here it is:
1 2 3 4 5 6 7 8 9 10 11 12 13 14 15 16 17 18 19 20 21 22 23 24 25 26 27 28 29 30 31 32 33 34 35 36 37 38 39 40 41 42 43 44 | |
A lot of this should look familiar from our original App.js file. This is the longest file in our new design pattern, but it is much simpler than our original App file. It is only responsible for maintaining the state, keeping an eye on the form, and sending along any new info to the Pet List component. Here’s that final component:
1 2 3 4 5 6 7 8 9 10 11 12 13 14 | |
The only difference here is that the Pet List component is getting the animals array passed from the Pet Form container as a prop.
Conclusion
That’s it. Our singe file app has been successfully refactored into a component and container design pattern. It will make expansion of our app much simpler by modularizing the responsibilities. It will also make the app much easier to maintain since we know exactly where to go if anything breaks. No more long scrolling sessions, straining our eyes to find a section of our app file. Happy coding!